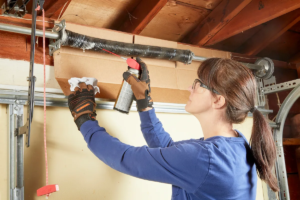
Garage Door Repair Blanchard can be complicated to work on. Even though DIY videos simplify a project, it’s best to leave the job to professionals.
A broken garage door is not only a physical hazard but also allows criminals to enter your home. Performing regular maintenance can help to prevent this.
The tracks of a garage door are another crucial part of the system, and they can get misaligned or bent over time. This can cause the door to move unevenly or even come off of its track altogether. It is important to check the tracks regularly for signs of damage and to have them repaired promptly by a professional technician.
It is also recommended to lubricate the tracks and rollers periodically to reduce friction and prevent wear and tear. Many people use WD-40, but the best lubricant is lithium-based. If the garage door is rusted, it may be necessary to apply a rust remover before re-lubricating the tracks and rollers.
If the tracks are not aligned properly, loosen the screws that hold them in place with a screwdriver. Then, carefully tap the track back into position using a rubber mallet. Repeat this step on the opposite side of the garage. Once the tracks are in alignment, tighten the screws or bolts that hold them in place.
If a garage door is out of alignment, it can be dangerous for anyone who attempts to open the door manually. It can also lead to more expensive repairs and permanent damage to the door and its hardware. At the first sign of problems, it is recommended to contact a professional garage door repair company that offers strong work guarantees and excellent reviews from other customers. In many cases, a garage door repair will only take a few hours to complete and is often cheaper than replacing the entire garage door system. It is also more cost-effective than allowing a problem to continue unchecked, which can result in costly structural damage and potentially even pose safety hazards for residents and their pets.
Check the Weather Stripping
The weather stripping that seals the gap between the bottom of your garage door and the floor is an important part of keeping your home warm and dry. It also helps you save on energy bills. If yours is worn or missing, it’s time to replace it. A good rule of thumb is to replace your weather stripping before it starts getting cold.
The bottom weatherstripping is usually composed of a PVC or aluminum support and a rubber strip. It’s common for the rubber to become discoloured or lose its flexibility, which is a sign that it needs to be replaced. Another sign that it’s time to change the weather stripping is when you can feel air moving through the bottom of your garage door. It’s best to check it on a windy day, but you can also hold a piece of paper up against the bottom of your garage door and see if it flutters in contact with a draft.
Perimeter weather stripping can wear down over time from opening and closing the garage door, which may lead to gaps where wind or light can get in. It can also be damaged by critters trying to make their way into the house, which is why it’s important to inspect it regularly.
If you’re not comfortable replacing your own weather stripping, it’s a job that’s best left to a professional. In addition to having the right tools, professionals know how to find and identify old weather stripping that’s in need of replacement. They can also make sure the new weather stripping is properly installed so that it can keep your garage in optimal working condition.
Check the Rollers
The garage door relies on its rollers to move up and down, but they can also be a source of problems. Loud or unusual noises, like squeaking or grinding, can signal that the rollers aren’t functioning properly or have come off the track. In addition, uneven movement may indicate the tracks or other parts of the system need to be aligned or lubricated. Performing these simple self-inspections can help you spot a minor issue before it becomes a serious problem.
Start by disengaging the opener and operating the door manually to ensure that safety mechanisms like auto-reverse and photo-eye sensors function properly before working on your garage door repair. Once you’ve verified that the system is safe to operate, use a rag to wipe down the entire length of the tracks and remove any dirt or buildup from the rollers. This can help prevent the tracks and rollers from rusting and make it easier for you to replace or install new ones.
Once you’ve cleaned the tracks and rollers, it’s time to check them for damage or misalignment. Forceful impacts, loose bolts, and weather conditions can all cause damage or cause the track to shift or come off of the rail. Check for any bends or cracks in the tracks and use pliers to manually straighten them if necessary.
Once the track is in place, remove any old rollers from their hinges and replace them with new ones. Be sure to match the old and new rollers for proper alignment. Once the rollers are in place, lubricate them with a quality product like Clopay Pro Lube to reduce friction and keep your garage door running smoothly.
Check the Springs
The garage door’s springs are the key to supporting its weight and regulating how it lowers. If the springs become damaged or broken, it can cause the door to close unevenly and damage other components like the tracks and rollers.
Identifying a problem with the springs can be tricky if there is no visible damage, but you can do a few things to check. One is to listen for a bang or pop when the spring breaks. The other is to observe the door’s movements and notice any differences. For example, if the garage door moves faster on one side than the other, that’s an indication that the springs are wearing out and need to be replaced.
A loud squeaking noise when opening or closing the garage door may also indicate that the springs are breaking or worn out. Sometimes, simply applying some lubricant will help fix this issue, but if the squeaking persists, it may be a sign of more significant problems.
Another way to check the springs is to measure them with a tape measure. You will need to unwind the springs in order to do this, so it is a good idea to ask for assistance from a professional service technician. Make sure you measure both springs, as it is important to replace them in pairs. This ensures they are properly matched, which can help maximize their cycle life.
When replacing the springs, it’s also important to take the time to properly install them. Start by removing the set screw and bolt from the winding cone and the stationary cone. Then, carefully remove the old spring and slide the new one in place. Once you have installed both of the springs, you can re-install the center bracket and the stationary cone.
Check the Opener
The garage door opener is the brains of the system, controlling everything from opening and closing to the safety sensors. However, like any motorized device, it can experience issues.
Fortunately, the problem is usually not as complicated as you might think. In fact, there are a few simple checks you can perform to see what is causing your opener problems.
One of the first things you should do is to make sure the power cord for the motor unit is plugged in and working properly. You can also try plugging in a different electric appliance to test the outlet itself. If nothing happens, it may have lost power or the cord might be damaged.
Next, check the sensors. Sensors are a great safety feature that keep people and pets from being hit by the garage door as it closes. If the sensors are dirty, it can cause them to fail to work correctly. To clean the lenses, use a cloth with a mild cleaner that doesn’t leave streaks. Then, gently wipe away any dirt or residue.
Another reason for the sensors to not work is that they are misaligned. Ideally, each sensor should be pointed directly at the other. If you notice that one of the lights is blinking, it means that the sensor is out of alignment. To fix this, you can either tighten the screw holding up the bracket that is out of place or gently bend it back to its original position.
Although DIY solutions can help, a professional repairman can often solve the problem more quickly and effectively. Performing your own DIY repair can also break your warranty and potentially lead to additional expenses down the line.